Ford Explorer 6th Gen Walk-In Switch Installation Review
Service Price
$approx. $1,500+
Estimated price · Actual price may vary by shop

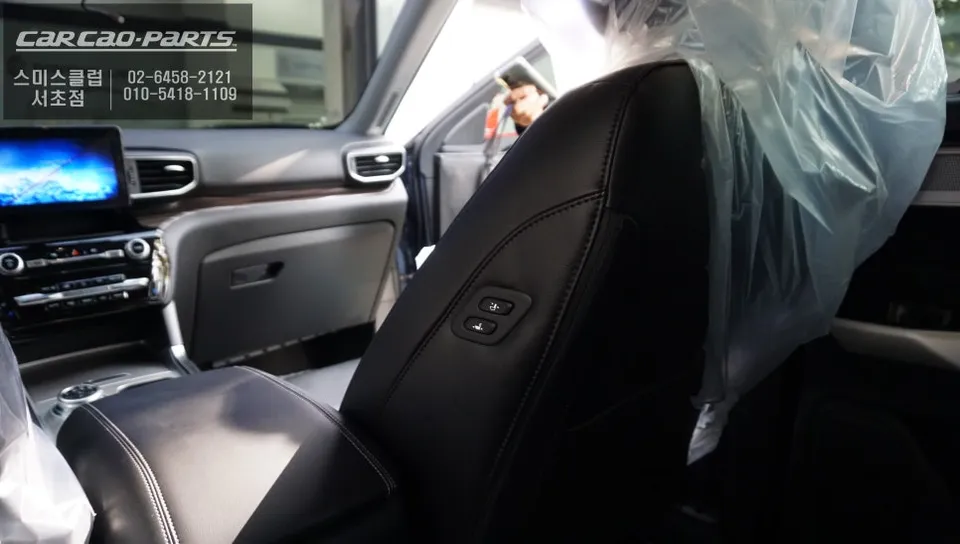
Ford Explorer 6th Gen walk-in switch installation for enhanced rear passenger comfort. Improves accessibility and convenience.
Enhancing Rear Passenger Comfort with a Walk-In Switch for the Ford Explorer 6th Gen
The 6th generation Ford Explorer, a spacious SUV, can sometimes present a minor inconvenience when it comes to adjusting the front passenger seat for rear occupants. This is particularly noticeable when needing to maximize rear legroom or assist passengers in settling in. To address this, a walk-in switch, also known as a remote seat adjustment function for the front passenger seat, offers a practical solution. This review details the installation process and benefits of adding this convenient OEM option to your Ford Explorer.
What is a Walk-In Switch and Why is it Beneficial?
A walk-in switch allows for the remote control of the front passenger seat's fore-aft position and recline angle. This is incredibly useful for drivers who frequently transport passengers in the rear seats, especially children. Instead of exiting the vehicle or awkwardly reaching over to adjust the seat manually, the driver or a rear passenger can operate the switch to create more space. This feature is invaluable when loading bulky items, installing child seats, or simply ensuring maximum comfort for those in the back. The installation involves integrating a control module and switch that interfaces with the existing power seat motors.
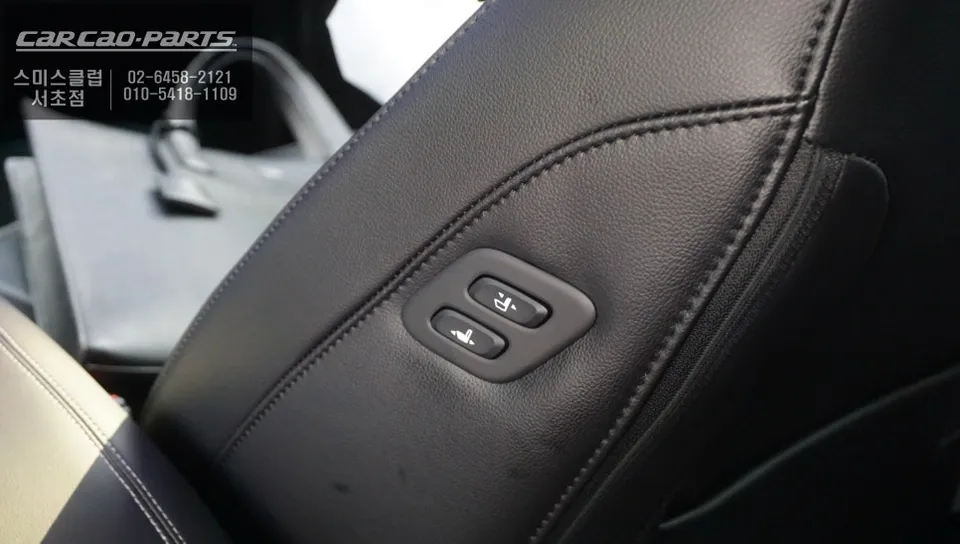
Ford Explorer 6th Gen Walk-In Switch Installation Process
The installation of a walk-in switch for the Ford Explorer 6th Gen is a precise process that requires careful handling of the vehicle's electrical systems and interior components. Here’s a breakdown of the typical steps involved:
- Seat Removal and Disassembly: The front passenger seat is carefully removed from the vehicle. Subsequently, the seat's base and upholstery are partially disassembled to gain access to the power seat motor wiring harness.
- Wiring Integration: The new control module is connected to the power seat motors. This involves precisely tapping into the existing wiring without causing damage, ensuring a secure and reliable electrical connection.
- Switch Installation: A designated location on the side of the passenger seat is chosen for the switch. This area is meticulously measured and cut to accommodate the new switch, often a genuine OEM part for seamless integration and durability. The cut edges are then sealed to prevent moisture and dust ingress.
- Module and Harness Connection: The main control module is connected to the integrated wiring harness and the newly installed switch. All connections are soldered and secured to ensure long-term functionality and prevent issues like loose connections or intermittent operation.
- Reassembly and Testing: Once all electrical connections are made and secured, the seat is reassembled and reinstalled in the vehicle. A thorough functional test is then performed from all control points (driver's seat, passenger seat, and rear seats) to verify that the seat adjusts smoothly and correctly in all directions.
Using a genuine OEM switch, such as one from Genesis, ensures compatibility, reliability, and a factory-like finish. The process requires specialized knowledge of automotive electronics and seat mechanics to ensure a safe and effective installation. The entire procedure typically takes about 2 to 3 hours to complete.

Post-Installation Verification and Usage Tips
After the installation, rigorous testing is crucial. The walk-in switch should respond promptly, allowing the passenger seat to move forward, backward, and recline smoothly without any hesitation or partial movements. It's important to be mindful when using the walk-in function, especially if someone is about to sit down. Ensure the seat has finished its movement before a passenger attempts to occupy it to prevent any pinching hazards. This thoughtful addition significantly enhances the practicality and passenger experience of the Ford Explorer 6th Gen.

Frequently Asked Questions
Q. How much does OEM option and factory upgrade installation cost for a Ford Explorer 6th Gen?
The cost for this specific OEM option installation on a Ford Explorer 6th Gen is approximately 200,000 Korean Won. While specific US pricing varies, similar aftermarket convenience features can range from $150 to $400 depending on the complexity and parts used.
Q. How long does OEM options installation take on a Ford Explorer 6th Gen?
The installation of the walk-in switch typically takes about 2 to 3 hours to complete. Proper installation ensures the durability and longevity of the system, with minimal maintenance required beyond ensuring connections remain clean and secure.
Q. Are OEM options worth adding after purchase for a Ford Explorer 6th Gen?
Adding a walk-in switch is highly beneficial for those who frequently transport rear passengers, significantly improving convenience. It adds considerable value by enhancing the overall comfort and practicality of the vehicle for all occupants.
Q. How are OEM factory options installed on a Ford Explorer 6th Gen?
Installation involves removing the passenger seat, accessing and integrating with the power seat motor wiring, installing a new control switch in a designated location, and securing all electrical connections. The seat is then reassembled and tested for full functionality.
Q. What is the difference between dealer-installed options and aftermarket upgrades for a Ford Explorer 6th Gen?
Dealer-installed options, like this walk-in switch using OEM parts, are designed for perfect integration and reliability. Aftermarket upgrades may offer more variety but can sometimes compromise vehicle systems or aesthetics if not chosen carefully.
Kakao Parts